Why do I need logs?
The purpose of this guide is to configure the collection of Logs in an Intune environment. By default the log analytics you enable in Intune does not give you much information beyond auditing basic things. With this approach we can record any desired log for all of our machines. There is a companion video for this setup https://youtu.be/Uw3GjMnSXbI.
Enabling Log Analytics
- Navigate to endpoint.microsoft.com
- Select Reports
- Select Diagnostic Settings
- Select Add Diagnostic setting
- Select all options under Log
- Select Send to Log Analytics workspace
- Select a Log Analytics workspace
- You can archive to a storage account to keep data longer
Now that we have the log analytics workspace configured we can configure the Microsoft Monitoring Agent (MMA)
Configuring the Microsoft Monitoring Agent
- Navigate to portal.azure.com
- Navigate to your log analytics workspace
- Select Advanced Settings
- Select Data
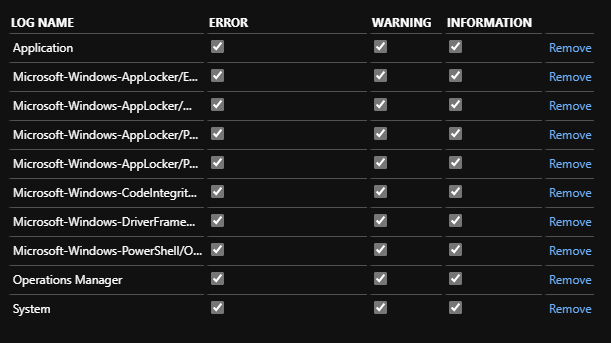
You can now add any event log you wish to collect. Begin typing a log you wish to collect and it should auto populate. If the log you wish to use does not appear you can type in the full log path and it will be added. I’ve included an example of a few logs below, please bare in mind that if the log is not enabled by default you will still need to enable that log separately.
- Navigate back to your log analytics workspace
- Select Agents management
- Copy down the Workspace ID and Primary Key
- Select Download Windows Agent (64bit)
- Create a folder and put the MMA-Setup-AMD64.exe inside of it
- Open command prompt and run MMA-Setup-AMD64.exe /C in the directory your install exists

- Extract the contents to your desired folder
- Download the repo located Github-IntuneContentPrep
- Extract and run the IntuneWinAppUtil.exe
- Specify the source folder
- Specify the setup file (Setup.exe)
- Specify an output folder

Creating the MMA app deployment
- Navigate to endpoint.microsoft.com
- Select Apps
- Select Windows
- Select Add
- Select Windows app (Win32)
- Select the app package from the output folder you created in the previous steps
- Change the following
- Name : Microsoft Monitoring Agent
- Publisher: Microsoft
- Logo: Add any logo you’d like
- Select Next
- Set the install command to:
setup.exe /qn NOAPM=0 ADD_OPINSIGHTS_WORKSPACE=1 OPINSIGHTS_WORKSPACE_AZURE_CLOUD_TYPE=0 OPINSIGHTS_WORKSPACE_ID="WORKSPACEID" OPINSIGHTS_WORKSPACE_KEY="KEYSAVED" AcceptEndUserLicenseAgreement=1" - Change the WorkspaceID and WorkspaceKey to the ones you recorded earlier
- Paste the same for the uninstall command
- Select Next
- Add your Requirements
- Select Next
- Manually configure a detection rule
- Select Add
- Select Registry
- Key path:
Computer\HKEY_LOCAL_MACHINE\SYSTEM\CurrentControlSet\Services\HealthService\Parameters\Management Groups\AOI-#YOURWORKSPACEID - Change the #YourWorkspaceID section to what you recorded earlier
- Select Ok
- Select Next
- Select Next
- Add Assignments
- Select Next
- Select Create
Checking the logs
Once the clients receive the agent you should be able to check for a heartbeat immediately in log analytics. I’ll show two quick queries we can run as an example.
- Navigate to portal.azure.com
- Navigate to your log analytics workspace
- Select Logs
- In the query section type the following and select Run:
Event<br>| where TimeGenerated > ago(24h)<br>| limit 10
This will bring up the last 10 log events that were registered in log analytics, we limit to 10 for testing purposes. Next we will look at querying a specific log and showing a specific set of columns we are interested in.
Event| where EventLog == "System"| project TimeGenerated, EventLog, EventLevelName, EventID, RenderedDescription, Computer
At this point you have everything configured and are only limited to your querying knowledge!
Jake Shackelford Admin/Contributor

Jake is one of our Admins but also our inaugural author and the main reason SysManSquad exists today.